Quantcast
Channel: Oracle Trainings for Apps & Fusion DBA | RSS Feed
Viewing all 20 articles
Browse latest View live

“oamDS”: ORA-28001: The Password Has Expired

$
0
0

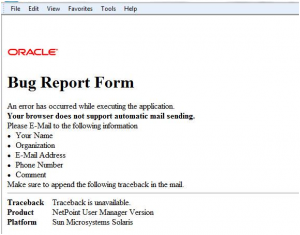
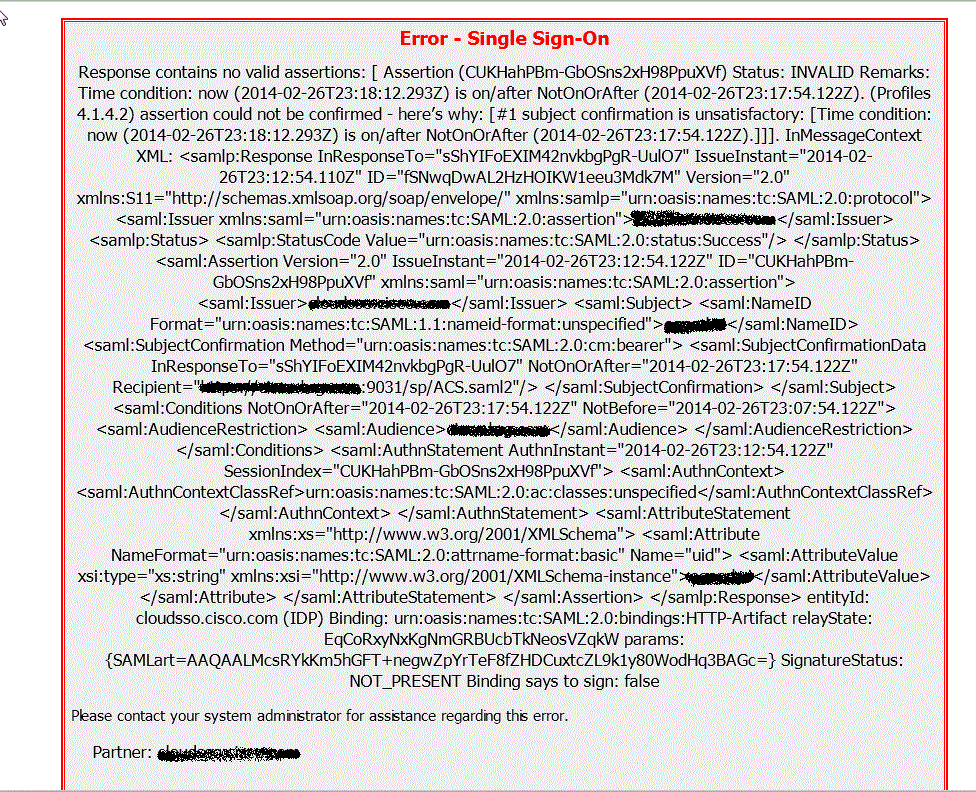
Recently i come across an issue where R12 E-Business Users which was integrated with OAM 11g for SSO were not able to login.They were getting error message as shown below:

From first look of redirection URL in browser, it appears that it was crossing the OAM authentication process and it was the application which is throwing the error.
To verify, we check application.log and Apache. error log under $LOG_HOME/ora/10.1.3  but there were no error messages written.
We verified if  AppsLocal Login was working and the login was working.

Next  step was to check in E-Business Access gate log file, default location- /tmp/fndauth0.log on server where you deploy the E-Business Access gate. The log file shows below error

02-Jul-2012 11:04:02 oracle.apps.fnd.ext.common.server.FndSsoFilter doFilter
WARNING: FndSsoFilter::doFilter()– error encountered
Throwable occurred: oracle.apps.fnd.ext.common.server.FndSsoException: Unknown exception. Please contact your System Administrator.
Caused by: weblogic.jdbc.extensions.PoolLimitSQLException: weblogic.common.resourcepool.ResourceLimitException: No resources currently available in pool “VISR12″  to allocate to applications, please increase the size of the pool and retry..
at weblogic.jdbc.common.internal.JDBCUtil.wrapAndThrowResourceException(JDBCUtil.java:252)

The error complains about no resource available in connection pool of Weblogic  which means the problem was with JDBC datasources.
Next, check OAM Server output log file ,default location $DOMAIN_HOME/servers/oam_server1/logs/oam_server1.out . Log  file show below error:

<02-Jul-2012 11:05:34 o’clock BST> <Warning> <oracle.oam.foundation.access> <OAMSSA-04006> <Cannot get connection from data source.
weblogic.jdbc.extensions.PoolDisabledSQLException: weblogic.common.resourcepool.ResourceDisabledException: Pool oamDS is Suspended, cannot allocate resources to applications..
at weblogic.jdbc.extensions.PoolDisabledSQLException.<init>(PoolDisabledSQLException.java:11)

Which reflect problem is with OAM datasource  “OAMDS”
At this stage check DB which stores OAM schema is up and reachable from OAM node and check for errors in DB alert log file under $USER_DUMP_DEST location in database.

On restarting the datasource the oam server log file show below error:

Received exception while creating connection for pool “oamDS”: ORA-28001: the password has expired
02-Jul-2012 11:21:31 o’clock BST> <Warning> <oracle.oam.foundation.access> <OAMSSA-04006> <Cannot get connection from data source.
weblogic.jdbc.extensions.ConnectionDeadSQLException: weblogic.common.resourcepool.ResourceDeadException: 0:weblogic.common.ResourceException: Could not create pool connection. The DBMS driver exception was: ORA-28001: the password has expired
at weblogic.jdbc.common.internal.JDBCUtil.wrapAndThrowResourceException(JDBCUtil.java:250)

Login to DB which hold OAM schema and query for OAM schema as shown below:-

SQL> select USERNAME,ACCOUNT_STATUS,EXPIRY_DATE from dba_users where USERNAME  like ‘%OAM%’;

USERNAME      ACCOUNT_STATUS    EXPIRY_DATE
———————       ——————–           ———
OAM_IAU_VIEWER         OPEN
OAM_IAU                     OPEN
OAM_IAU_APPEND         OPEN
OAM_OAM                    EXPIRED         10-JUN-12

Reason:- With 11g database , Password_life_time in DEFAULT profile is set to 180days and PASSWORD_GRACE_TIME is set to 7 days.

Use below query to see your default profile:-
SELECT * FROM dba_profiles WHERE profile = ‘DEFAULT’ AND resource_type = ‘PASSWORD’;

PASSWORD_GRACE_TIME  parameter sets the number of days that a user has to change his or her password before it expires.
PASSWORD_LIFE_TIME  parameter sets the number of days the user can use his or her current password.

Alter these parameter value to Unlimited in DEFAULT profile as:-

SQL> ALTER PROFILE DEFAULT LIMIT PASSWORD_LIFE_TIME UNLIMITED;

SQL> ALTER PROFILE DEFAULT LIMIT PASSWORD_GRACE_TIME  UNLIMITED;

Enable the user by resetting their passwords as

alter user <prefix>_oam identified by <password>;


OAM 11g Integration with Apex 4.1.0

$
0
0

In this post I would like to explain the high level integration points of Oracle Access Manager 11g and APEX.

The integration architecture is given below.

It is assumed in the post that OAM 11g and APEX are installed and configured already. The typical integration flow is explained below:

  • Register OHS 11g WebGate. The integration is supported with 10g Agent as well, but 11g webgate is explained in this post.
  • Application Domain and host identifiers will be created respectively.
  • Create a new Resource in the APEX specific application domain with details as given below.

Type – HTTP
Host Identifier – APEX
Resource URL – /apex/apex_authentication.callback
Protection Level – Protected
Authentication Policy – Protected Resource Policy
Authorization Policy – Protected Resource Policy

  • Goto the authorization policy and specify the following header variables in actions.

Name: OAM_REMOTE_USER_GROUPS; Type: Header; Value: $user.groups
Name: OAM_REMOTE_USER_EMAIL; Type: Header; Value: $user.attr.mail

  •  Install OHS 11g WebGate and copy all the artifacts that are generated during webgate registration to webgate config folder.
  • Edit the httpd.conf or dads.conf for mod_plsql module to work correctly.

<Location /apex>
SetHandler pls_handler
Order deny,allow
Allow from all
PlsqlDocumentPath docs
PlsqlDocumentProcedure wwv_flow_file_manager.process_download PlsqlDatabaseConnectString orcl ServiceNameFormat
PlsqlNLSLanguage AMERICAN_AMERICA.AL32UTF8
PlsqlAuthenticationMode Basic
PlsqlDocumentTablename wwv_flow_file_objects$
PlsqlDatabaseUsername APEX_PUBLIC_USER
PlsqlDatabasePassword *****
PlsqlDefaultPage apex
PlsqlRequestValidationFunction wwv_flow_epg_include_modules.authorize PlsqlCGIEnvironmentList HTTP_OAM_REMOTE_USER
PlsqlCGIEnvironmentList HTTP_OAM_REMOTE_USER_GROUPS PlsqlCGIEnvironmentList HTTP_OAM_REMOTE_USER_EMAIL
</Location>
Alias /i/ /path/to/APEX/images/

  • Bounce the OHS 11g server.
  • Login to Oracle APEX environment.
  • Select the application to be configured from Application Builder
  • Select Shared Components, click Authentication
  • Click Create, select Based on a pre-configured scheme from the gallery, click Next
  • Enter a Name, select Scheme Type of HTTP Header Variable, enter HTTP Header Variable Name HTTP_OAM_REMOTE_USER. Please

Test the SSO now by accessing the APEX application. It should redirect to the authentication scheme that is configured for APEX application in OAM Admin console.

References: Integration Guide


“RequestCacheType” setting in OAM 11g

$
0
0

This post will talk about an important setting of OAM 11g high availability environment. The Oracle doc for setting up OAM 11g in HA is here.

The section 8.8.3.11 explains changing request cache type. Let us see the importance of this flag and certain other factors where this is essential.

When a user access a OAM 11g protected resource then the OAM server needs to remember about the user’s original request. This data is defined using a parameter in oam-config.xml located at $DOMAIN_NAME/config/fmwconfig as shown below.

<Setting Name="serverRequestCacheType" Type="xsd:string">COOKIE</Setting>

The permitted values are BASIC (set by default), COOKIE and FORM.

NOTE: FORM is introducted in OAM 11.1.1.5 and is not present in 11.1.1.3 version.

BASIC: In this mode the OAM Server stores the information in memory. This mode could not be used in an OAM Cluster High Availability environment because during the authentication process, the client might be redirected to different OAM Server instances and the information about the original request is only available in the memory of one OAM Server instance. This mode requires the Login Page to return the “request_id” value.

COOKIE: In this mode the OAM Server creates an encrypted OAM_REQ cookie to store the information. This mode could be used in a High Availability environment.  The Login Page only needs to return the username and password.

FORM:  In this mode the OAM Server sends the information about the original request via a POST request using an encrypted OAM_REQ value.  This mode could be used in a High Availability environment. The login page must return the OAM_REQ value.

So OAM_REQ cookie is set in both cases COOKIE and FORM by the OAM server but login page should return to OAM server only for FORM scenario.

If you are using custom Login page in your environment then you will need to return specific values to the OAM server from login page as per the Request Cache Type setting.

How to change this parameter?

wlst.st tool can be used to change it to either BASIC or COOKIE but it does not reflect the changes for FORM.

So as an alternative solution perform manual changes to oam-config.xml as follows:

  1. Stop all OAM servers (admin + managed servers)
  2. Change the serverRequestCacheType value in the oam-config.xml located at $DOMAIN_HOME/config/fmwconfig
  3. Start all OAM servers.

Another scenario where this parameter is essential is when the requested resource URL is too large. Consider the user is having a valid OAM session and access another resource A where resource A URL is too large.

Since the user is having a valid session already it does not generate OAM_REQ cookie anymore and user will be redirected to resource A succesfully.

However if the user does not a valid session and access resource A directly then OAM server stores the original requested resource information in an encrypted cookie OAM_REQ. Since the original resource URL is too large the OAM_REQ cookie is also too large. The problem only occurs if long URL access triggers redirect to OAM for login.

In case of IE it may result in error “Internet Explorer cannot display the webpage”. This is because of the IEs maximum browser URL restriction (2083 characters)

If the user is using Firefox where there is no URL restriction but the problem occurs when cookies (OAM_REQ in this case) are storing large content and it will result in firefox crash.

So the best solution is to change the Request Cache Type setting to FORM value.

Hope this helps.

References: metalink note 1348419.1

how to configure a single sign-on system that assigns different authentication levels to different partner applications with OAM

$
0
0

Hi All,

After a one month gap I am writing blog and apologize for such a gap. Now I’m come back with good post. In this post I would like to explains how to configure a single sign-on system that assigns different authentication levels to different partner applications with OAM.

OracleAS Single Sign-On enables you to assign different authentication levels to the applications that it protects. You can then map these authentication levels to specific authentication plugins.

Environment Details:

Here, we have OAM 10g , two SSO servers(OID/OSSO 10g-10.1.4.3.0) and oracle portal 11g.

Integration details, Portal having own SSO server(OID/OSSO 10g-10.1.4.3.0) and portal application registered as a partner application in portal OSSO. Portal OSSO server is integrated with OAM for centralized authentication because in our project more than 10 application integrated with OAM10g(10.1.4.3.0) for SSO.

We are accessing all applications through Oracle Portal(11g) application by clicking links under portal workspace.

Employees, customers and agents applications are deployed in oracle portal 11g. All application will serve once OAM authentication successfully done because portal osso url’s are protected by OAM but our requirement is customer authentication alone bypass from OAM.

Solution is if application* would access the Portal site using a *different virtualhost*.

 Implementation steps and issues: 

  1. Oracle SSO 10g could be configured to implement a different authentication module for Customers accessing the Portal using the different hostname. Instead of using the OAM integration authentication module, OSSO would be able to use the default OSSO login module for native OSSO authentication.
  2. Of course the Customer virtualhost would not be protected by OAM, so the webgate would allow all requests for pages using that virtualhost through without redirection for OAM login. 

Reference documentation for implementation of different OSSO authentication modules for different sites/virtualhosts:

Oracle Application Server Single Sign-On Administrator’s Guide 10g (10.1.4.0.1)

6 Multilevel Authentication

http://docs.oracle.com/cd/B28196_01/idmanage.1014/b15988/multilevel.htm

  1. Protect the portal application url’s using form based authentication in OAM.

          /portal/pls/portal/PRT_PORTAL.wwsec_app_priv.login    

          /portal/pls/portal/PRT_PORTAL.wwpob_smd.login

     2.   Protect the Portal osso url’s using anonymous authentication in OAM.

          /pls/orasso/orasso.wwsso_app_admin.ls_login    

          /sso/auth

Note: pass the header variables in both policy.

     3.    Customer virtualhost would not be protected by OAM so no need to specify url’s in OAM.

     4.    Implement OSSO Multilevel Authentication in OSSO policy.properties e.g.

                 empportal.domain\:7777 = HighSecurity

                 customerportal.domain\:7777 = MediumSecurity

                 HighSecurity_AuthPlugin = oblix.security.ssoplugin.SSOOblixAuth

                 MediumSecurity_AuthPlugin = oracle.security.sso.server.auth.SSOServerAuth

      5.    Restart osso server.

 So the flow for Employees and Agents would now be:

a) User accesses Portal page http://empportal.domain:7777/portal/pls/portal -> the Portal public homepage is displayed.

b) User clicks on the Portal Login link in the homepage -> request for http://empportal.domain:7777/portal/pls/portal/PRT_PORTAL.wwsec_app_priv.login is issued

c) WebGate on Portal OHS finds that http://empportal.domain:7777/portal/pls/portal/PRT_PORTAL.wwsec_app_priv.login is protected -> user redirected to OAM login page

d) User submits valid credentials -> WebGate sets the ObSSOCookie for domain .eng.co.in and redirects back to http://empportal.domain:7777/portal/pls/portal/PRT_PORTAL.wwsec_app_priv.login

e) Portal receives the /portal/pls/portal/PRT_PORTAL.wwsec_app_priv.login request and checks for authenticated Portal session -> none exists so Portal redirects user to http://sso.eng.co.in:7778/pls/orasso/orasso.wwsso_app_admin.ls_login?site2pstoretoken=….  for OSSO login

f) WebGate on OSSO OHS finds that http://sso.eng.co.in:7778/pls/orasso/orasso.wwsso_app_admin.ls_login is protected by an anonymous policy so does not perform authentication because the existing ObSSOCookie has a higher authentication level than the anonymous authentication scheme. WebGate only performs authorization and sets the HTTP Header for OSSO-OAM integration on authorization success, to the user id obtained from the ObSSOCookie/OAM session token (not OblixAnonymous).

g) OSSO receives the http://sso.eng.co.in:7778/pls/orasso/orasso.wwsso_app_admin.ls_login request and checks which partner application invoked the login request – it is found to be empportal.domain:7777 so the HighSecurity login module (SSOOblixAuth) is executed, which reads the HTTP Header for OAM-authenticated user identity and completes creation of the OSSO session.

h) OSSO redirects back to the Portal partner application login success URL at http://empportal.domain:7777/pls/portal/PRT_portal.wwsec_app_priv.process_signon

i) Portal processes OSSO login success and creates the Portal session cookie.

j) Portal redirects back to the default homepage for the authenticated user at at http://empportal.domain:7777/portal/pls/portal


The flow for Customers would be:

a) User accesses Portal page http://customerportal.domain:7777/portal/pls/portal -> the Portal public homepage is displayed.

b) User clicks on the Portal Login link in the homepage -> request for http://customerportal.domain:7777/portal/pls/portal/PORTAL.wwsec_app_priv.login is issued

c) WebGate on Portal OHS finds that http://customerportal.domain:7777/portal/pls/portal/PORTAL.wwsec_app_priv.login is NOT protected so allows the request through uninterrupted. No ObSSOCookie is set.

d) Portal receives the /portal/pls/portal/PORTAL.wwsec_app_priv.login request and checks for authenticated Portal session -> none exists so Portal redirects user to http://sso.eng.co.in:7778/pls/orasso/orasso.wwsso_app_admin.ls_login?site2pstoretoken=…..for OSSO login

e) WebGate on OSSO OHS finds that http://sso.eng.co.in:7778/pls/orasso/orasso.wwsso_app_admin.ls_login is protected by an anonymous policy so sets an OblixAnonymous ObSSOCookie in the session without prompting for OAM login. WebGate only performs authorization and sets the HTTP Header for OSSO-OAM integration on authorization success with value OblixAnonymous.

f) OSSO receives the http://sso.eng.co.in:7778/pls/orasso/orasso.wwsso_app_admin.ls_login request and checks which partner application invoked the login request – it is found to be customerportal.domain:7777 so the MediumSecurity login module (SSOServerAuth) is executed.

g) OSSO does not read the OSSO-OAM integration HTTP header because it is not relevant for the SSOServerAuth module. It checks for an existing SSO_ID cookie and finding none redirects the user to the default OSSO login page for login.

h) User submits valid credentials to OSSO.

i) OSSO processes the native authentication request and sets the OSSO SSO_ID cookie in the session.

j) OSSO redirects back to the Portal partner application login success URL at http://customerportal.domain:7777/pls/portal/portal.wwsec_app_priv.process_signon

k) Portal processes OSSO login success and creates the Portal session cookie.

l) Portal redirects back to the default homepage for the authenticated user at http://customerportal.domain:7777/portal/pls/portal


Firewall timings management in access environment

$
0
0

Hi All,

Today I would like to cover firewall timings management in access environment.

Here, we have OAM 10g , two SSO servers(OID/OSSO 10g-10.1.4.3.0), oracle portal 11g, OBIZ, SOA, Seibel and etc.

Integration details, Portal having own SSO server(OID/OSSO 10g-10.1.4.3.0) and portal application registered as a partner application in portal OSSO. Portal OSSO server is integrated with OAM for centralized authentication because in our project more than 10 application integrated with OAM10g(10.1.4.3.0) for SSO.

All applications are integrated with OAM 10g. We are accessing all applications through Oracle Portal(11g) application by clicking links under portal workspace.

We were tested application performance by using load runner. During run our OAM server went down automatically and I have noticed some error in logs.

ERROR —/usr/abuild/Oblix/coreid1014/palantir/webgate2/src/web_gate.cpp:143: Error: Exception re-thrown from ObWebGate::Init( <NULL> = <NULL>, <NULL> = <NULL> )%0a../obthread.cpp:748: Error: Exception re-thrown in ObThread::Start%0a../obthread.cpp:726: Error: Create thread failed, error message is Resource temporarily unavailable%0a

/…/oblix/apps/common/bin/start_access_server: fork: Resource temporarily unavailable

Could not start the Access Server. The watchdog is stopping.

This usually means you have hit the limit on the number of running processes, and cannot start any more.

So I thought it was happened due to heavy load in OAM, then I tuned all OAM components as mentioned in this link

http://docs.oracle.com/cd/B28196_01/idmanage.1014/b25344/perform.htm#sthref24

But no luck, again OAM server went down automatically but this time OAM handled more time compare to previous time failure. Again finger crossed :( .

After long investigation, the real root cause has been find out. The real problem due to firewall timeout.

Here, I have specified my workarounds. 

  1. Validate any firewall exist between Access Server and LDAP ? (is it OID ? or active server ).
  2. Validate any firewall exist between Access Server and webgate ?
  3. ran immediately once OAM server went down
    netstat -a > connections.txt
  4. In connection.txt I have noticed 11k connections in TIME_WAIT state. It is clear that server restart due number of big connections , and most probable firewall is involved here.
  5. Implemented doc id : 1253194.1

“Configuration Recommendations
The overall recommendation is simply to keep firewall connection timeout limits higher than the Access Clients’ maximum connection time….”

The problem is vanished and our performance test went smoothly without any issues. Hope, this post helped you. :)

EBS OAM integration : Logout should re-direct to different URL

$
0
0

EBS R12 integration with OAM 11g is covered in detail (with step by step instruction) in eBook eBook – E-Business Suite Integration with OID/OAM for Single Sign-On that I co-authored with Neha Mittal

This book also cover configuring logout (oacleanup.html) during AccessGate deployment by supplying Logout Page with paramater -DWebgateLogoutURL like

-DWebgateLogoutURL=http://innowave12.com:7777/public/oacleanup.html

When user clicks on logout link, this URL will logout user from both OAM and E-Business Suite Application and present user again AccessGate Login Page .


One of our readers requirement was that after logout instead of presenting Login Page, system should redirect User to different URL like (company’s website http://myCompnay.com)

To achieve this you use end_url as query parameter for logoutURL so during Access Gate deployment use -DWebgateLogoutURL like

-DWebgateLogoutURL=http://innowave12.com:7777/public/oacleanup.html?end_url=http://myCompany.com 


More on Logouts in OAM 11g here


Related Posts for Apps SSO/OID Integration


  1. 25 Things Apps DBA should know for Apps 11i/R12 Integration with OID/SSO
  2. Questions for Oracle Apps 11i & R12 Integration with 10g AS/SSO
  3. Oracle Single Sign-On Server for Apps DBA
  4. Clone Apps 11i/R12/12i integrated with SSO
  5. Notes/Docs to integrate Apps 11i with 10g AS Portal/OID/SSO
  6. Migrate Users to/from OID and Oracle Apps 11i/R12
  7. User created in Apps 11i/R12/12i not sync to OID
  8. Apps 11i/R12/12i Registration/Deregistration with OID/SSO : internals
  9. Error while running SSO registration on 11i : txkrun.pl -script=SetSSOReg
  10. How to Deregister SSO/OID from Oracle Apps 11i/R12/12i
  11. Error adding new User (11i) – unable to call fnd_ldap _wrapper .create_user
  12. Unable to call fnd_ldap_wrapper . create_user / update_user ORA-20001
  13. Oracle Access Manager 11g is now certified with E-Business Suite (Apps) R12
  14. Integrate Oracle Apps (E-Business Suite) R12 with Oracle Access Manager (OAM) 11g for SSO
  15. EBusiness Suite (Apps R12) integration with OAM 11g : inter component communication and Ports to open in FireWall
  16. 10g WebGate Installation with OAM 11g : Access Server ID, Port and WebGate ID
  17. EBS R12 integration with WebCenter – Error retrieving WSDL at URL OA_HTML/ portlets/ WSRPBaseService?WSDL
  18. Integrate E-Business Suite with Oracle WebCenter (11.1.1.5) using OID and OAM (11g) as SSO
  19. EBS R12 integrated with SSO (OAM/OSSO) prompting for username / password again : Your Oracle E-Business Suite account has not been linked
  20. EBS OAM integration : Logout should re-direct to different URL

Bug Report Form issue in Identity/Access console

$
0
0

Hi All,

Today I would like to share the issue which I faced.  

Problem Description: In Oracle Access Manager 10g (10.1.4.3), getting below issue when I tried to click tab’s under identity/access console.

Cause: In Oracle Access Manager 10g (10.1.4.3), Traceback reporting in the Bug Report Form and Stylesheet Error Report Form is disabled by default. These pages display only the message “Traceback is unavailable.” in the Traceback field. However, oblogs reflect the entire Traceback.

Note: Oracle recommends that traceback functionality remains disabled. Enabled only if there is a problem that is causing Bug Report Form and Stylesheet Error Report Form events.

How to enable:

For Identity Server:

     1.    Open Identity Server globalparams.xml file in the following path:

                 Eg: IdentityServer_install_dir\identity\oblix\apps\common\bin\globalparams.xml 

     2.    Add the EnableTraceback parameter with the value set to true, and save the file.

               <SimpleList>

                     <NameValPair   ParamName=”EnableTraceback” Value=”true”></NameValPair>

               </SimpleList>

      3.    Restart the Identity Server.

      4.    Repeat steps 1 through 2 for each Identity Server in your deployment.

 For Access Server:

      1.    Open the Policy Manager globalparams.xml file in the following path:

                  Eg: PolicyMsanager_install_dir\access\oblix\apps\common\bin\globalparams.xml 

      2.    Add the EnableTraceback parameter with the value set to true, and save the file.

                 <SimpleList>

                          <NameValPair      ParamName=”EnableTraceback”     Value=”true”></NameValPair>

                  </SimpleList>

      3.    Restart the Policy Manager Web server.

      4.    Repeat steps 1 through 2 for each Policy Manager in your deployment.

OAM server gets shut down automatically : fork: Resource temporarily unavailable

$
0
0

Hi All,

Today I ‘m very happy to share some information regarding a show stopper issue which I faced few days back in production box.

The issue was  when the load gets increased in the server , OAM server gets shut down Automatically.

For more information, Please go through below :

Problem Description:

We are using 2 single sign on solutions in which OAM is the centralized authentication server for tracks like portal,Siebel,OBIZ etc. .

  1. OAS SSO 10.1.4.3
  2. OAM 10.1.4.3

The problem was when the load gets increased in the server , OAM server gets shut down automatically.

Error details:

-bash-3.00$ /u01apps/oaminstall/access/oblix/apps/common/bin/access_server_watchdog: fork: Resource temporarily unavailable

/u01apps/oaminstall/identity/oblix/apps/common/bin/ois_server_watchdog: fork: Resource temporarily unavailable

Access Server has stopped running. Starting a new instance.

OIS Server has stopped running. Starting a new instance.

/u01apps/oaminstall/identity/oblix/apps/common/bin/start_ois_server

/u01apps/oaminstall/access/oblix/apps/common/bin/start_access_server: fork: Resource temporarily unavailable

/u01apps/oaminstall/identity/oblix/apps/common/bin/ois_server_watchdog: fork: Resource temporarily unavailable

Could not start the Access Server. The watchdog is stopping.

/u01apps/oaminstall/identity/oblix/apps/common/bin/start_ois_server: fork: Resource temporarily unavailable

/u01apps/oaminstall/identity/oblix/apps/common/bin/start_ois_server: fork: Resource temporarily unavailable

Error: Could not determine your OS. Aborting.

Access Server has stopped running. Starting a new instance.

Using Linux Threading Library.

For Past 2 weeks , I was breaking my head to fix up showstopper issue. Lots of workaround & alternate solution approach was buzzing up in my mind  and I was cracking in all possible ways whether the Issue might have happened  because of  Hardware sizing or memory space issue /Loading or Version Problem or Connection Reached to maximum Limits but I never thought that a single change in the server will end the showstopper issue easily J

 I would like to share  the point  which I covered during analyze.

  1. Verified soft and hard limits for file descriptors and number of processes available to a users.

             Result: Limit value looks pretty okay and less possibility for occurrence of issue

     2.   As a rule of thumb,  verified on the firewall timeout the Maximum Client Session Time should be slightly less than firewall inactivity connection timeout value.

             Result: Changed Accordingly , but still the problem persists

      3.  As a rule of thumb, verified on the OAM component version, Access Server and Identity Server need to have version greater than or equal than webgate version.

              Result: Applied with latest version BP13 but same problem persists.

       4.  Verified the resource policies for all tracks.

              Result: Configuration looks pretty okay and less possibility for occurrence of issue

I was wondering & didn’t get any clue where the issue persist . Few days before when I was reading oracle trouble shooting document (http://docs.oracle.com/cd/E15217_01/doc.1014/e12489/trblsht.htm .)

Immediately something strike in my mind , I got some clue and suspected that the issue might have happened  due to F.10 NPTL Requirements and Post-Installation Tasks

Here by the solution :

Solution: The native libraries support something called NPTL which stands for “Native POSIX Thread Library. This library allows Linux to run multithreaded program much faster regardless. the program is 32 bit or 64 bit. The Linux 5 OS comes with this library by default.

Start identity Server using start_ois_server_nptl instead of start_ois_server

Start Access Server using start_access_server_nptl instead of start_access_server

Note: We were used to start the server without NPTL.

These NPTL scripts use the new multithreaded NPTL capable libraries, resulting better performance.

Hope this post would help you if you are facing same kind of issue. :)


Hostname and Url prefix invisible in oracle policy manager console

$
0
0

Hi All,

Two days back i have faced some funny issue in my project. Issue was, suddenly hostname and url prefix got disappear from oracle policy manager. I couldn’t able to see hostname/url prefix under resource tab which we have already configured. I’m wondered how it happened suddenly.

Here i would like tell you how I found the issue and how i fixed it.

1. First enable the OID into debug mode, parameter flag orcldebugflag from 0 to 1 and orcldebugop from 0 to 511. More details Metalink ID: 397821.1

2. Then reproduce the issue.

3. Captured the ldap logs, from this logs i got some clue about the issue. There is a lot of MissingEdn errors in OID. It mean, response for search query is not complete some of the search response were missing.

Solution:

========

Based on error, i have found two metalinks which deals this issue.

OID Is Not Returning The Attributes For All Users When Queried [ID 1087626.1]
Search Performance Issues With OID 10.1.4.3 [ID 1051152.1]

 OID Is Not Returning The Attributes For All Users When Queried [ID 1087626.1]

=========================================================

With the following db parameters set for the system the issue does not occur
- set optimizer_features_enable = ’10.2.0.4′
- set “_hash_join_enabled” = false
- set “_gby_hash_aggregation_enabled” = false

or
- set optimizer_features_enable = ’10.2.0.3′

Search Performance Issues With OID 10.1.4.3 [ID 1051152.1]

==========================================

Download Patch 9344963 from My Oracle Support and install in OID server according to README instructions

Issue got vanished once I completed the above steps. Hope this post will help you if you are facing this issue. Thanks :)

Troubleshooting the error “The signing certificate does not match what’s defined in the entity metadata”

$
0
0

I was working on federation with IDP as custom solution and SP as fedlet. The SAML authentication request and SAML response was generated successfully. However while validating the SAML response by Fedlet, it was throwing the below error in the browser.

Upon looking at libSAML2 debug file I could see 2 exceptions in the logs

ERROR: KeyUtil.getVerificationCert: No signing KeyDescriptor for entityID=XXXXXX in IDPRole role.

ERROR: SAML2Utils: The signing certificate does not match what’s defined in the entity metadata.

entityID is the ID value provied in fedlet.cot file in fedlet configuration.

Troubleshooting process:

Identity provider was signing the SAML response and encrypting the assertion. So the signing and validation has worked before and it is failing all at once.

IDP will provide the certificate in the metadata that they provide. Service Provider  (Fedlet) verifies if the signature is valid by first checking if there is a certificate configured in Identity provider metadata signing block. Then it checks with Trusted Certificate for validating the signature. I have verified the IDP metadata in fedlet configuration and found that certificate was missing in Signing section which is the root cause of this error.

After placing the Signing block in IDP metadata and restarting the application server containing fedlet, the federation has worked!!

OAM 10g IWA implementation with IIS 7.5

$
0
0

This post explains the implementation details around achieving IWA authentication for IIS 7.5 using OAM 10.1.4.3.

Refer to the list of supported / available webgates for respective IIS version and OS version here.

We’ve used Windows 2008 R2 64-bit, IIS 7.5 in our environment. It is assumed that WebGate instances, Host Identifiers, Authentication Schemes and Policies were created already. This post explicitly explains the configuration changes required at IIS servers for IWA mechanism.

First and foremost is installing the Webgate on IIS windows box.

Some of the important notes are:

  1. Select the Server Type as IIS in the installation wizard.
  2. You might see some pop-ups to replace the dll files matching the webgate. Some of those DLLs are msvcirt.dll, mfc70.dll, obnss3.dll etc., Click Yes to replace all those DLL files.
  3. Click Yes to automatically update the IIS configuration.

Here are the actual SSO configuration changes required:

  • Goto C:\Windows\System32\inetsrv\config in WebGate box. Take backup of applicationHost.config file. Edit the applicationHost.config file and search for segment word. Remove the line <add segment=”bin” /> and Save the file.
  • Open the IIS Manager.
  • Go to Sites
  • Click on Site to be protected for IWA.
  • Click ISAPI Filters in the center pane.
  • Verify that OracleWebGate is added pointing to webgate.dll. If it is not already added, create one.
  • Goto Sites. Right click on Site application and click Add Virtual Directory.
  • Specify Alias as access. Specify Physical path as WebGate access folder. Click OK.
  • Select access and double click Handler Mappings in center-pane
  • Click Edit Feature Permissions in Actions pane
  • Enable Execute check-box and click OK
  • Goto webgate access folder D:\Oracle\webgate\access and right click and select Security. Verify the following.
  1. Verify user “IUSR”, has “Allow” for “Modify”
  2. Verify user “IIS_IUSRS”, has “Allow” for “Modify”
  3. Verify user “NETWORK”, has “Allow” for “Modify”
  4. Verify user “NETWORK SERVICE”, has “Allow” for “Modify”
  5. Verify if group “Administrators” has “Allow” for “Modify”
  • Goto Site. Double click Authentication
  • Right click on Anonymous Authentication and disable it. Right click on Windows Authentication and enable it
  • Restart IIS using iisreset


Integrating OAM with Bridge-way eCounsel

$
0
0

This post explains the integration of OAM 10.1.4.3 with Bridge-way eCounsel application using IWA mechanism. Please refer the previous post for IWA implementation steps.

What is Bridge-way eCounsel?

Bridgeway eCounsel is the complete, easy-to-use matter management solution that lets you easily track every detail for any matter, assign and manage internal staff and outside counsel, manage your legal spend, analyze trends, and more—from anywhere, via the Web.

Bridge-way eCounsel Application has Suite-Manager wizard which lets us to manage the  identities/authentication mechanisms and other eCounsel specific features.

eCounsel is a web application that is deployed on WebLogic Servers. So we have used IIS as proxy for WebLogic defining IWA on IIS for OAM authentication purposes.

Follow the below steps to configure Suite Manager to perform SSO with eCounsel application.

Suite Manager SiteMinder integration changes:

Bridge-way supports Site-Minder as 3rd party SSO. Here we are impersonating the Site Minder using OAM WebGate by passing a header variable which is consumed by Bridge-way to allow user single sign-on.

  • Login to Suite Manager as administrator
  • Double Click on Authentication
  • Click on tab SiteMinder Integration
  • Specify the header variable name as sm-user. Please note that this is case-sensitive
  • Enable the checkbox SiteMinder Integration enabled
  • Click Save.

Suite Manager User Mapping:

Prior SSO, all the Bridge-way users should be mapped with Site-Minder ID which is the header variable passed by OAM webgate. Usually it is NT ID of the user coming from OAM User Store.

  • Login to Suite Manager with admin privileges
  • Double click on Users/Groups.
  • Search for the user id to be mapped in the Filter textbox
  • Edit the user
  • Specify NT ID in the SiteMinder ID field as shown in below screenshot.
  • Click Save
  • Repeat these steps for all eCounsel users.

Further steps will be continued in next post.


Integrating OAM with Bridge-way eCounsel.. Cntd..

$
0
0

This post is continuation to OAM integration with Bridgeway eCounsel application for SSO here.

The previous post covers the configuration changes required at Suite Manager console. If you access the eCounsel application through IIS server then you will see that IWA happening however a window pop-up would appear asking for credentials again.

This is because eCounsel application is deployed in WebLogic Servers and it does not honor the cookies set by OAM. Few configurations to be made at WebLogic server are explained below:

  • Login to WebLogic Admin server box.
  • Open command prompt window
  • Go to the folder <WL_HOME>/common/bin
  • Execute the wlst.cmd
  • Execute connect() and enter appropriate details.
  • Execute cd(‘SecurityConfiguration’)
  • Execute ls()
  • Execute cd(‘<domain-name>’)
  • Execute ls()
  • Observe the parameter EnforceValidBasicAuthCredentials which would be set to true
  • Execute edit()
  • Execute startEdit()
  • Execute cd(‘SecurityConfiguration’)
  • Execute cd(‘<domain-name>’)
  • Execute set(‘EnforceValidBasicAuthCredentials’,'false’)
  • Execute save()
  • Execute activate()
  • Restart all managed and admin servers for changes to take effect.

Test the eCounsel Application:

Login to Windows machine as normal AD user and try to access eCounsel application through IE browser.

Open the IE headers tool to see the OAM cookies set.

Interested in reviewing my book ? Oracle E-Business Suite (Apps) R12 integration with OAM 11gR2 and OID 11gR1

$
0
0

I am ready with next version of my book (co-author Neha Mittal) “E-Business Suite (R12) integration with OID/OAM for Single Sign-On” which covers step by step integration of Oracle E-Business Suite R12 (12.0 or 12.1) with Oracle Access Manager 11gR2 (11.1.2.1.0) and Oracle Internet Directory 11gR1 (11.1.1.7).  Book also covers what happens behind the scenes and what to expect at each stage of installation, configuration and integration.

Note: OAM version 11.1.2.1.0 and OID 11.1.1.7 are latest version available as of Oct 2013

If you are interested in reviewing this book and fit under any one of the below list then contact me via email (atul [at] onlineAppsDBA.com ) or leave a comment :

1. You are a blogger and write about either Oracle E-Business Suite (Apps), Identity Management, Database, or Fusion Middleware

or

2. You have written any book in the past

or

3. Working/Supporting Oracle E-Business Suite (Apps R12) integration with OAM/OID for Single Sign-On


Interested in book review ? Leave a comment or or drop me a mail (Please mention if you are blogger or have written a book) !!


Steps to Integrate Discoverer 11g with OAM 11g

$
0
0

Of late, I was working on configuring Oracle BI Discoverer 11g Release 1 (11.1.1) single sign-on using Oracle Access Manager 11g. I Followed the procedure below to use Oracle Access Manager with Oracle BI Discoverer:

Assumptions :

  1. Oracle BI Discoverer is Installed and configured.
  2. Oracle Access Manager is Installed and configured.
  3. EBS Instance  is configured with WNA (Zero Sign on) using OAM/OID 11g (Read Atul’s Book “EBS integration with OAM 11g R2″).

Steps to configure Discoverer 11g with OAM:

  1. Register the OSSO agent (mod_osso) with OAM 11g.
  2. Open oamconsole and under System Configurations->Access Manager ->SSO agents->OSSO Agent, create one osso agent.


Following registration with OAM 11g, the mod_osso module:

  • Checks for an existing valid Oracle HTTP Server cookie
  • Redirects to the OAM Server if needed to contact the directory during authentication
  • Decrypts the encrypted user identity populated by the OSSO server
  • Sets the headers with user attributes

Base URL  http://cph-core-db01-s:8888 . It will create Application domain, resource URLs, host identifier, Authentication Policies and authorization policies.

Apply the changes

After it is created, it looks like below.


3. On Discoverer OHS server

Edit the mod_osso.conf file as follows:

  1. Copy the mod_osso.conf file from the
    $MW_HOME/instance_name/config/OHS/ohs1/backup/disabled directory to the
    $MW_HOME/instance_name/config/OHS/ohs1/moduleconf directory.
  2. Create a folder named ‘osso’ under the location $MW_HOME/instance_name/config/OHS/ohs1/ and copy the osso.conf file generated after registration (Step 2) at $DOMAIN_HOME/output/osss_agent_name/ (OAM Server)
  3. Edit the mod_osso.conf file from the location $MW_HOME/instance_name/config/OHS/ohs1/moduleconf and add the following lines:
  4. LoadModule osso_module “${ORACLE_HOME}/ohs/modules/mod_osso.so”
  5.  

<IfModule osso_module>

  OssoIpCheck off

  OssoIdleTimeout off

  OssoHttpOnly off

  OssoSecureCookies off

  OssoConfigFile MW_Home1/asinst_1/config/OHS/ohs1/osso/osso.conf


  <Location /discoverer/plus>

  require valid-user

  AuthType Osso

  </Location>


  <Location /discoverer/viewer>

  require valid-user

  AuthType Osso

  </Location>


  <Location /discoverer/app>

  require valid-user

  AuthType Osso

  </Location>


</IfModule>

  1. Save the mod_osso.conf file.
  2. Restart Oracle HTTP Server by running the following opmnctl commands located at ORACLE_INSTANCE\bin directory:
  3. opmnctl stopall
  4. opmnctl startall

 Post Steps :

  1. Ensure that the value of OssoConfigFile is set correctly in mod_osso.conf file. Ensure that the values of OssoIPCheck and OssoHTTPOnly parameters in the mod_osso.conf file are set to off.
  2. Start Fusion Middleware Control, and navigate to the Discoverer Administration page. Select the ‘Allow authenticated Oracle Single Sign-On (SSO) users to create and use private connections to SSO-enabled Oracle Applications databases, without entering a password’ check box. Verify attribute enableAppsSSOConnection=”true”in $DOMAIN_HOME/config/fmwconfig/servers/WLS_DISCO/applications/<discoverer_version>/configuration/configuration.xml
    1. Restart the Oracle Access Manager server that is hosting the OSSO Agent.
    2. Verify whether the Oracle BI Discoverer URLs can be accessed through the OAM authentication screen.

To enable WNA for application domain disco_agent

Policy Configuration ->Application domains->disco_agent->authentication Policy->protected Resource Policy

Change the Authentication Scheme to “KerbrosScheme” (one which is already being used by WNA enabled EBS Application domain)


Save the changes.

Add the TNS details for EBS to be accessed using Discoverer, on Discoverer side.

That EBS Instance must be SSO enabled and configured with Same OAM Instance.

Now,Open the URL : http://cph-core-db01-s:8888/discoverer/plus

Since its WNA enabled, you will directly see below page for my user (there are three connections defined).


To use SSO, we have to create private connections respectively for each user (Three defined for my user).

How to add a New Connection :

1. Access http://cph-core-db01-s:8888/discoverer/plus 

2. Click on create Connection Button.

3. Fill the details like its given in below snapshot

4. click continue and it will populate your username in user name field automatically

5.  Click Ccontinue, then select the responsibility from dropdown and click continue again.

6. Select end user type from dropdown, click continue (your connection is now created ) and will connect for first time to Disco plus applet.


Now this private connection will be visible on Discover Plus home page for your user.

Points to note :

1. http://cph-core-db01-s:8888/discoverer/plus  will be the single URL for users (we don’t need users to use connection key)

2. Since each user can have his/her own private connections, like for my user HARSN-IN (you will have different private connections for your respective user)


Private connections of one user, won’t be visible to another user and vice –versa.

So given that each user has made his/her private connection, when he /she will access this  http://cph-core-db01-s:8888/discoverer/plus URL . the user will see the connections defined for his/her user.

3.  When they will click on the connection they want to access , Discoverer Plus Applet will open without asking for any credentials directly (SSO working).


4.  Users will have to define connections themselves which they frequently use on Home page of discoverer Plus.

5.  AFAIK , SSO works for defined private connections only not for the below part of home page (Connect directly) :


 Refer The below Notes from Metalink :

Using Discoverer 11.1.1 with Oracle E-Business Suite Release 12 (Doc ID 1074326.1)

How To Integrate Discoverer 11g With Oracle Access Manager ( OAM / SSO ) 11g (Doc ID 1448235.1)


Working with Access Server SDK 10.1.4.3 and OAM 10g

$
0
0

Hi All,

I’ve written a post earlier about working with 10g Access Gates using Oracle Access Manager 11g. Today, I would like to give insights into implementation of 10g Access Gates using Oracle Access Manager 10g. Access Server SDK 10g is used for Access Gates where out of the box webgates are not available for a web server.

In OAM 10g, Access Server SDK is available in both 32-bit and 64-bit modes in Windows/Linux environments.

  1. First and foremost, download the right Access Server SDK installer for your environment. Go through this ReadMe document to know more about existing Access Server SDK versions.
  2. Create Host identifier in OAM Access Console.
  3. Create Access Gate instance in OAM Access Console. You will need to specify the details AccessGate Name, Hostname, Access Gate Password, Transport Security, Access Management Service, Primary HTTP Cookie Domain, Preferred HTTP Host. You can also specify other Access Gate parameters such as Debug mode, Session timeouts etc.,
  4. Create Policy domain in OAM Policy Manager for the custom application. Specify the authentication scheme, authorization rules etc., accordingly.
  5. Goto the machine where Access SDK needs to be installed. Install the Access Server SDK with proper user privileges.
  6. Goto the directory %ACCESS_SDK_INSTALL_DIR%/oblix/tools/configureAccessGate where %ACCESS_SDK_INSTALL_DIR% is the Access Server SDK installed directory.
  7. Configure the Access Gate using the below command configureAccessGate.exe -i %ACCESS_SDK_INSTALL_DIR% -t AccessGate -w <<ACCESS_GATE_NAME>> -m <<SECURITY_MODE as open/simple/cert>> -P <<ACCESS_GATE_PASSWORD>> -h <<ACCESS_GATE_HOSTNAME>> -p <<ACCESS_GATE_PORT>> -a <<ACCESS_SERVER_ID>>
  8. If you get this message “AccessGate installed Successfully.” then the Access Gate installation is successful. Otherwise verify the input parameter values for the above issued command.
  9. Set the following environment variables. Set PATH to %PATH%;%ACCESS_SDK_INSTALL_DIR%/oblix/lib. Set CLASSPATH to %ACCESS_SDK_INSTALL_DIR%/oblix/lib/jobaccess.jar. Set OBACCESS_INSTALL_DIR to %ACCESS_SDK_INSTALL_DIR% .
  10. If you are using Linux environment, set additional environment variable LD_LIBRARY_PATH to %ACCESS_SDK_INSTALL_DIR%/oblix/lib.
  11. Make sure that Access Server SDK and JDK are of the right versions. For eg., if the JDK is 64-bit and Access Server SDK is 32-bit, then java code execution will fail.

Testing:

If you want to test a stand-alone java code download the JAccessClient.java from section 4.1 in this documentation and place it in a directory.

  1. Goto java code directory. Compile the javacode using javac JAccessClient.java.
  2. If there are any compiler errors and if it throwing error while compiling com.oblix.access class files, then jobaccess.jar is not placed in CLASSPATH properly.
  3. Run the javacode using java JAccessClient.

If your custom application is deployed in an application Server (say Tomcat) then embed the OAM API code and set the environment variables in Application Server Startup scripts. If you are writing the code in a Java Editor such as Eclipse, make sure to add the jobaccess.jar present in %ACCESS_SDK_INSTALL_DIR%\oblix\lib in the  application classpath.


OAM 10g integration with Cisco Prime Service Catalog

$
0
0

I’ve got an opportunity to integrate Cisco Prime Service Catalog application 10.1 with Oracle Access Manager 10g.  FYI: OAM 10g is not certified with Cisco Prime Service Catalog product for SSO integration.

Here is the requirement:

There are lot of applications in the organizations which are integrated with OAM 10g for SSO. Cisco Prime Service Catalog is another application added to SSO applications spectrum.

Background of Cisco Prime Service Catalog:

Service Catalog Directory Integration simplifies security administration and enhances user convenience and productivity by implementing centralized user authentication and synchronization with an enterprise directory.

This product is capable of talking to External directories for authentication purpose and external products for Single Sign-On purpose. However for SSO, it expects header variables or cgi variables.

Integration Process:

  1. Cisco Prime Service Catalog is installed in JBOSS application server front ended by IIS web server.
  2. Install WebGate on IIS web server and this is as usual.
  3. Create Policies in OAM for protecting the root URL.
  4. Change the SSO configuration at Cisco Prime Service Catalog product. Login into Cisco Prime Service Catalog and goto Administration.
  5. Goto Directories. Click on Events.
  6. Edit the Login functionality. Make sure that Login event is enabled. Select Operation as Single Sign-On from the drop-down.
  7. Click on Additional Options button. Select the Header Variable Radio button.
  8. Specify the Login ID Mapping as OAM_REMOTE_USER. This is the header variable name specified in OAM authorization rule Actions and it returns user id.
  9. Specify the Authentication Failure URL in Redirect URL text box.
  10. Click Update. Please refer the below screenshot.

This completes the SSO configuration changes at Cisco Prime Service Catalog application.

Testing:

Access the application URL http://host:port/RequestCenter/ which prompts for authentication configured in policy. Submit the credentials and it will redirect to application home page.

Observations:

While working on this integration, Cisco product was honoring OAM_REMOTE_USER header variable and not REMOTE_USER which was interesting. It may be possible that this header variable name was specified in one of the product configuration files or it is how the product is configured.

Helpful links:

Documentation is here.

Response contains no valid assertions: Ping Federate

$
0
0

Hi All

One of the partners for which they are PingFederate integrated already were getting below error while performing Single Sign-On. We are IDP and partner is SP and PingFederate is used at both ends using Artifact profile.

If you observe closely it is complaining about Time Condition. Thumb rule is that IDP and SP ends should be in time sync including Time Zone. This is  because the assertion generated at IDP end is valid only for the time interval that is defined in SP specific settings at IDP PingFederate. The setting is shown in below screenshot.


If the SP PingFederate server is having time difference more than these time intervals defined then it will result in SAML assertion validation failure.

OAM 11g SAML SSO Integration with AtTask

$
0
0

WorkForce AtTask is a cloud based project management solution and it is capable of talking SAML. Recently I had integrated AtTask application with Oracle Access Manager 11gR2 for SAML SSO integration where AtTask is SP and OAM is IDP. AtTask uses its own repository for users. OAM uses AD LDAP for authentication store. Like any […]

The post OAM 11g SAML SSO Integration with AtTask appeared first on Oracle Trainings for Apps & Fusion DBA.

OAM 11g : Authorization headers are not passed to downstream applications

Viewing all 20 articles
Browse latest View live